ShopDreamUp AI ArtDreamUp
Deviation Actions


Description
Ever looked at the average doll eye painting tutorial and it's left you a little boggled?
Ever wondered if all that brown and orange was really necessary?
Ever been put off trying because it all seemed a little too much to take in?
I know I am still puzzled by a lot of the unnecessary steps you supposedly need to take, so I have decided to put together a simple tutorial that anyone can understand and follow (she hopes *lol*).
...................................................................
Before you start, here is list of things you need and things you should have to hand:
Non oiled based acrylic paint and varnishes. 2 fine paint brushes - I use 3/0 and 5/0, but you can also get 10/0, 20/0 and 30/0. Plus a 3rd old brush for mixing paint.
An eye dropper for watering down the paint (get from a chemist/pharmacy for a few pence/cents), cotton buds/Q-tips, plain white kitchen paper for wiping brushes, 2 pots of water for cleaning brushes and thinning paint, acetone free nail polish remover for dried mistakes and finally plenty of patience and time ^__^
................................................................
First rule of thumb; water down your paint. Add 2-4 drops with the dropper to your paint and mix in well with the old brush, what you want is paint that is the consistency of milk, this stops everything from looking globby and nasty, plus your paint won't dry out as quickly.
.....................................................................
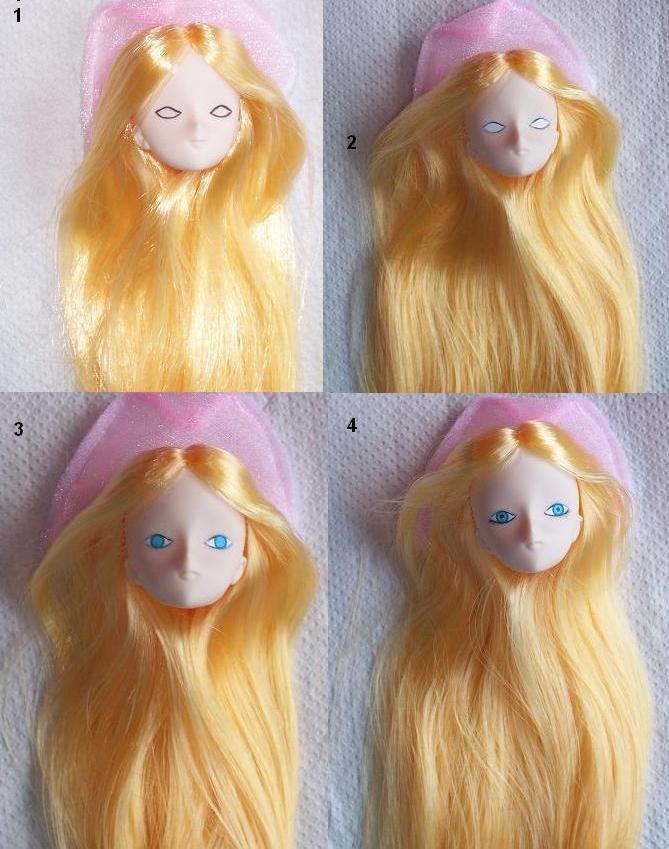
1/. I start with a dark brown and outline the shape of the eyes. For this anime style Obitsu W04 head, I have gone for larger looking eyes than normal.
Don't worry if it goes wrong, because until the paint dries, you can't wipe it off with a damp cotton bud, or after it's dried with a drop of the nail polish remover (remember, it must be acetone free!). You can keep wiping off until you're happy the eyes are even.
2/. The next stage is to fill in the whites. You will need to add plenty of coats to get the density you want, but don't be tempted to use unwatered down paint (it might be quicker, but the effect won't be smooth). Also make sure each coat is completely dry before applying the next.
This might seem a little time consuming, but it's well worth the effort and the time it takes.
3/. Once the whites are done, go on to the irises. Depending on the look you want to achieve, you can either paint the first stage competely black then add colour for the irises over the black, then add the pupil, or paint the iris in the darkest shade of the colour you want and add paler highlights after. In this instance, I have painted the darkest shade of colour and then added white to the paint to lighten the original colour and painted the inner section of the iris.
Again, make sure you water down the paint and add coats slowly. How many is totally dependent on how deep you want the colour to be.
At this point you need to be careful of mistakes, as they're not so easily rectified! If you smoodge paint into the white, you can wipe it off if it's wet, if it's dried in, try applying a little more white to cover it up, as of course you can't use the nail polish remover at this point. Really this part is down to patience and a fine brush ^__^
You can either add spots of light now or later, it doesn't make any difference. Just don't go overboard and make sure they're even in each eye. Try looking at someones eyes and see where the light reflects in them and use this as a guide for your doll.
4/. Next, outline the eyes. I usually use dark brown for the lower and black for the upper lids and lashes, but you can use whatever colours you want. You need to use your finest brush for this and try to complete the lines in one smooth stroke. Don't overload the brush with paint, wipe most of it off on the side of the pallet or the back of your hand. Add a few fine lashes for the lower section, then slightly heavier lines and lashes for the upper section. You may need to go over the lids a couple of times.
Ever wondered if all that brown and orange was really necessary?
Ever been put off trying because it all seemed a little too much to take in?
I know I am still puzzled by a lot of the unnecessary steps you supposedly need to take, so I have decided to put together a simple tutorial that anyone can understand and follow (she hopes *lol*).
...................................................................
Before you start, here is list of things you need and things you should have to hand:
Non oiled based acrylic paint and varnishes. 2 fine paint brushes - I use 3/0 and 5/0, but you can also get 10/0, 20/0 and 30/0. Plus a 3rd old brush for mixing paint.
An eye dropper for watering down the paint (get from a chemist/pharmacy for a few pence/cents), cotton buds/Q-tips, plain white kitchen paper for wiping brushes, 2 pots of water for cleaning brushes and thinning paint, acetone free nail polish remover for dried mistakes and finally plenty of patience and time ^__^
................................................................
First rule of thumb; water down your paint. Add 2-4 drops with the dropper to your paint and mix in well with the old brush, what you want is paint that is the consistency of milk, this stops everything from looking globby and nasty, plus your paint won't dry out as quickly.
.....................................................................
1/. I start with a dark brown and outline the shape of the eyes. For this anime style Obitsu W04 head, I have gone for larger looking eyes than normal.
Don't worry if it goes wrong, because until the paint dries, you can't wipe it off with a damp cotton bud, or after it's dried with a drop of the nail polish remover (remember, it must be acetone free!). You can keep wiping off until you're happy the eyes are even.
2/. The next stage is to fill in the whites. You will need to add plenty of coats to get the density you want, but don't be tempted to use unwatered down paint (it might be quicker, but the effect won't be smooth). Also make sure each coat is completely dry before applying the next.
This might seem a little time consuming, but it's well worth the effort and the time it takes.
3/. Once the whites are done, go on to the irises. Depending on the look you want to achieve, you can either paint the first stage competely black then add colour for the irises over the black, then add the pupil, or paint the iris in the darkest shade of the colour you want and add paler highlights after. In this instance, I have painted the darkest shade of colour and then added white to the paint to lighten the original colour and painted the inner section of the iris.
Again, make sure you water down the paint and add coats slowly. How many is totally dependent on how deep you want the colour to be.
At this point you need to be careful of mistakes, as they're not so easily rectified! If you smoodge paint into the white, you can wipe it off if it's wet, if it's dried in, try applying a little more white to cover it up, as of course you can't use the nail polish remover at this point. Really this part is down to patience and a fine brush ^__^
You can either add spots of light now or later, it doesn't make any difference. Just don't go overboard and make sure they're even in each eye. Try looking at someones eyes and see where the light reflects in them and use this as a guide for your doll.
4/. Next, outline the eyes. I usually use dark brown for the lower and black for the upper lids and lashes, but you can use whatever colours you want. You need to use your finest brush for this and try to complete the lines in one smooth stroke. Don't overload the brush with paint, wipe most of it off on the side of the pallet or the back of your hand. Add a few fine lashes for the lower section, then slightly heavier lines and lashes for the upper section. You may need to go over the lids a couple of times.
Image size
669x849px 84.88 KB
© 2007 - 2024 Tenshi-blues
Comments7
Join the community to add your comment. Already a deviant? Log In
Just what I needed! A tutorial I understand! I'm planning on making an Obitsu doll for myself after Christmas when I can buy it with my Christmas money. I hope I can get a head that isn't rooted so I can just buy the wig from an offical site so I can try myself. I definatly am adding this to my favorites.