ShopDreamUp AI ArtDreamUp
Deviation Actions


Suggested Deviants


Suggested Collections


You Might Like…


Description
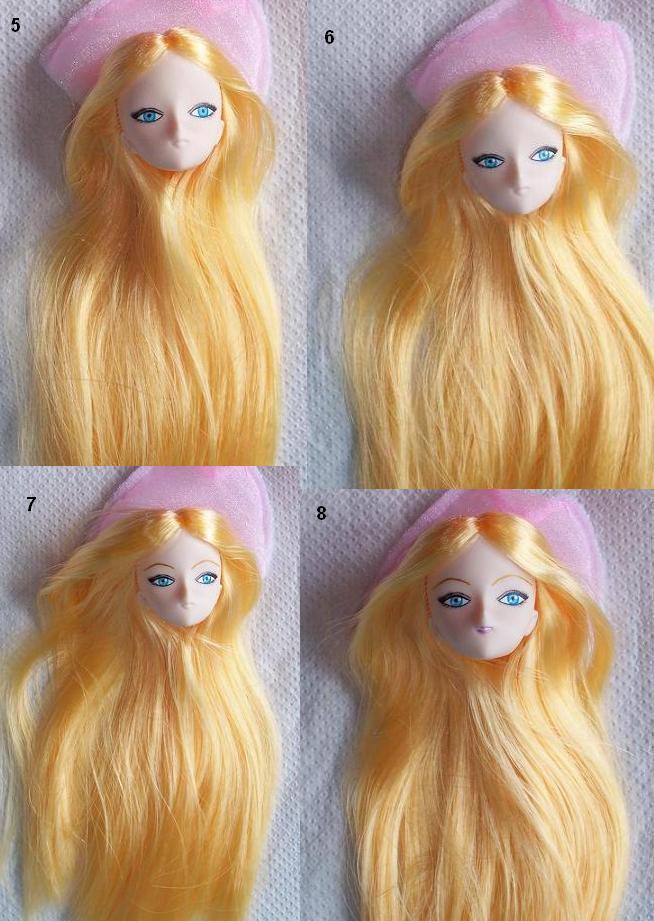
5/. Next, outline the eyes. I usually use dark brown for the lower and black for the upper lids and lashes, but you can use whatever colours you want. You need to use your finest brush for this and try to complete the lines in one smooth stroke. Don't overload the brush with paint, wipe most of it off on the side of the pallet or the back of your hand. Add a few fine lashes for the lower section, then slightly heavier lines and lashes for the upper section. You may need to go over the lids a couple of times.
The crease in the lid is next and I usually use whatever colour I did for the lower lashes (try not to use black, brown is best). You need to paint a fine line that follows the contours of the upper eye. Again, try looking at someone and use that as a reference.
6/. spots of light.
7/. Eyebrows next. 2nd rule of thumb, brows should be darker than the dolls hair (unless of course the hair is black *lol*).
Paint a fine line, you don't want thick brows (especially not for females) from the nose outwards, arch in the middle a little and curl at the end slightly. Add 2 or 3 coats to give the colour depth (remember all the paint you use needs to be thinned with water).
If you want the hairy brows look, paint small fine upward strokes which should get shorter towards the outer edge. You can also use 2 shades of the same colour paint to give the brows more depth.
8/. Lips I'm still practising, coz I'm still not so good at them!! but again it's just a case of applying coats of paint slowly. Try to avoid red lips if you can, as red paint will nearly always stain the doll and mistakes can happen with lips too!!
Simple is best until you're a real pro at lips ^__^ You can also add lip lines with a darker colour if you so wish.
..............................................................
Finally the varnish!
My 3rd rule of thumb; wait 24 hours before varnishing - let the paint breathe!
I use gloss on the irises and lips of girls, satin on guy lips and matt on everything else. 1 coat should be enough to protect your paint job, but if you want a second coat, wait til the first is completey dry.
Be as careful with the varnishing as the painting and try not to go over any unpainted areas.
....................................................................
Lastly, I wanted to point out you won't see me mention spray sealing the head before or after painting, as personally I don't see the point with a non eyehole head. Also I can't stand the horrible shean dolls tend to have if you've done that, but this is purely personal choice and it's up to you if you wish to spray seal before painting.
Image size
654x921px 96.48 KB
© 2007 - 2024 Tenshi-blues
Comments17
Join the community to add your comment. Already a deviant? Log In
I have a question, do you know of anything that'd be able to seal/gloss Vinyl dolls faces [like Obitsus] aside from Varnish and MSC?